CONTENTS
Servers and Routes
XYZ nodes are highly transparent to their Transport layer mechanism. In other words, inside the business logic of your application, you need to know the minimum about the underlying Transport layer of your message. The only information that you can provide to determine your transport type, which is optional, is defining an outgoing route/middleware for the message. We will learn about how to do this in this tutorial.
“Transport independence is the ability to move messages from one microservice to another without requiring microservices to know about each other”
– Richard Rodger. The Tao of Microservices
This Article can be divided into two sections:
- Outgoing Routes: an abstraction for different ways to send messages.
- Server Routes: an abstraction for different ways to receive a message.
We will start by discussing the former one.
Outgoing Routes
Each node in xyz has the ability to have multiple outgoing routes. This means that a node can send a message only using one of these outgoing routes. No message can be sent without going through an outgoing route and middleware. Each outgoing route is linked with an outgoing middleware stack. This means that each route can have different middleware functions, hence allowing you to separate your concerns. As an example, some messages might need to have encryption and some might not. In this case you can create two outgoing routes in your node, one for encrypted messages:
encrypted.message.mw: [/ENC] [_encrypt_message() -> _httpExport()]
and one for normal messages:
public.message.mw: [/PUB] [_httpExport()]
In this case, all of the messages that you send using encrypted.message.mw will be encrypted and sent out over https, while other messages using public.message.mw will be immediately exported using normal http.
To further simplify this, let’s have another look at the image that shows the generalized architecture of xyz-core:
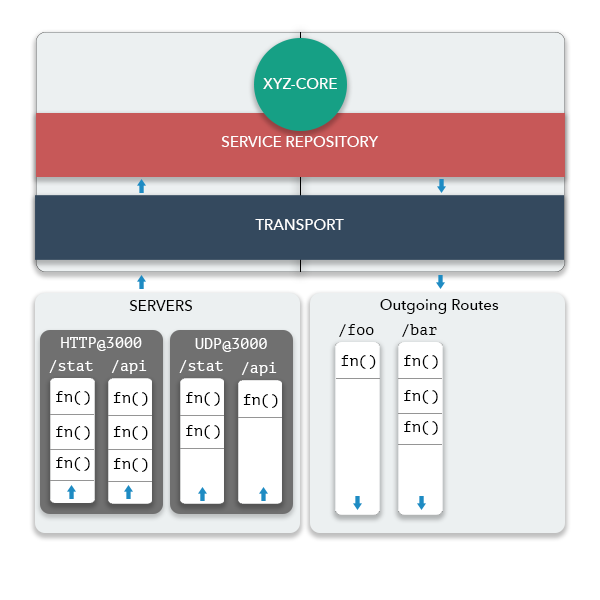
You should only pay attention to the right side of this image. As you see, This image shows a node with two outgoing routes, one having three middlewares and the other having just one. No need to say, the last function in any Transport layer middleware stack should be a function that actually sends the message, such as _httpExport or _udpExport.
A question might come to mind at this point. Aside from being linked to middleware, is a xyz outgoing route’s URL, like /foo and /bar in the image, actually analogous to a physical URLs, like http routes?
The answer is both yes and no, but you should consider it a no. This is because physical routes are meaningless if xyz is using anything other than HTTP. The truth is that in the case of HTTP, xyz will map these outgoing routes to physical routes, but, nonetheless, in other Transport mechanisms it will inject them to the payload of the message and the receiver will also extract them from the payload, not the URL.
Generally, you should consider xyz’s outgoing route’s URLs as an identifier of a particular middleware, not a physical route.
To wrap our introduction of outgoing routes, let’s talk about the default routes in a node:
If you run a barebones xyz node and console.log it:
let XYZ = require('./../../index')

let math = new XYZ({})

console.log(math)
you will see the output :
____________________  TRANSPORT LAYER ____________________
Transport:
  outgoing middlewares:
    call.dispatch.mw [/CALL] || _httpExport[0]
    ping.dispatch.mw [/PING] || _httpExport[0]
...
xyz will always create one default route in a system with the identifier/route /CALL. this route will be used by default whenever you send a message using .call(). We will soon see how you can change this behavior and send messages to other routes, but first we need to continue this discussion from the other end of a message’s path and talk about Server Routes.
The routes indicated by
/PINGare created using the default ping bootstrap function. if you create a node withlet ms = new XYZ({selfConf: defaultBootstrap: false})you will see that it will not be created. More on this in the Ping section
Server Routes
Each xyz node can have multiple servers of different type. This allows the same separation of concerns that we mentioned in the previous section from one level higher. That is to say, each node can have several servers and each server can have several server routes. As an example, you can see in the values of default configurations that each node will be created with one HTTP server on port 4000 with one default route /CALL:
HTTPServer @ 4000 ::
  Middlewares:
  call.receive.mw [/CALL] || _httpMessageEvent[0]
  ping.receive.mw [/PING] || _pingEvent[0]
Like the previous section, the
/PINGroute is created byping.defaultbootstrap function, notxyz-core.
Similar to each outgoing server’s last index, which should have been an actual transmission, the last index of every server route should be an event. This event will then be caught by the service layer to invoke the appropriate function.
You can look at the image of the previous section to recap this information in the architecture. In the image, the node has two servers, namely one HTTP and one UDP, each having two routes with distinct middlewares. No need to say, each of these servers must have a unique Port. Ports are particularly important to fathom in xyz because they are a part of the node’s identifier. recalling from previous tutorials, each node’s identifier is:
[IP]:[PORT]
and quoting from getting started section:
the actual identifier of the service is actually: [IP]:[PORT]:/[PATH].
Having multiple servers can cause confusion, since each node is listening on several ports. To resolve this issue, xyz establishes a contract between all components, declaring that each node’s identifier is determined by the port if its first Transport server. A method in xyz-core layer depicts this contract:
let XYZ = require('./../../index')
let math = new XYZ({})

console.log(math.id())
and you see:
{ name: 'node-xyz-init',
  host: '127.0.0.1',
  port: '4000',
  netId: '127.0.0.1:4000',
  _identifier: 'node-xyz-init@127.0.0.1:4000' }
Aside from name, host and port, you see two other keys: netId which is [HOST]:[PORT] and _identifier which is [NAME]@[HOST]:[PORT]. The source code of this method is:
id () {
    return {
      name: CONFIG.getSelfConf().name,
      host: CONFIG.getSelfConf().host,
      port: CONFIG.getSelfConf().transport[0].port,
      netId: `${CONFIG.getSelfConf().host}:${CONFIG.getSelfConf().transport[0].port}`,
      _identifier: `${CONFIG.getSelfConf().name}@${CONFIG.getSelfConf().host}:${CONFIG.getSelfConf().transport[0].port}`
    }
  }
As you can see, SelfConf().transport[0].port is used in both netId and _identifier.
with this information in mind, we know enough to start manipulating the routes and servers in a xyz node.
Using outgoing routes
In order to create a new outgoing route, you can use xyz.registerClientRoute(prefix, gmwh) function. The spec. of the function is described in the API DOC. This function accepts two parameters:
- prefix: another name for the
routename. - [gmwh]: an instance of the GenericMiddlewareHandler class in xyz-core. This middleware stack will be linked to the new route if defined. If not defined, an empty middleware stack will be linked.
Let’s create a simple node and add a new route named /SECRET to it.
math.registerClientRoute('SECRET')
console.log(math)
you should see the output :
Transport:
  outgoing middlewares:
    call.dispatch.mw [/CALL] || _httpExport[0]
    ping.dispatch.mw [/PING] || _httpExport[0]
    SECRET.dispatch.mw [/SECRET] ||
Note that a
/will be prepended to route name by default
As you see, SECRET.dispatch.mw [/SECRET] || is currently empty. In order to access this middleware and append a function to it we can use the normal middlewares() syntax that was explained in getting-started section:
function _msgConfigLogger(params, next, end, xyz) {
        console.log(`CONFIG LOGGER :: ${params[2]}`)
        next()
}

math.registerClientRoute('SECRET')
math.middlewares().transport.client('SECRET').register(0, _msgConfigLogger)
You can now see:
Transport:
  outgoing middlewares:
    call.dispatch.mw [/CALL] || _httpExport[0]
    ping.dispatch.mw [/PING] || _httpExport[0]
    SECRET.dispatch.mw [/SECRET] || _msgConfigLogger[0]
Of course, this middleware currently does nothing but logging one of its parameters, but that is not the point of this article. Though, let’s insert this middleware into the default CALL middleware and see the values. As you might remember, params[2] is the config object of the message.
We also need to register a function in the local node and call it to see middleware in action, otherwise any .call() will be rejected with a local response.
Side note: xyz nodes do NOT distinguish local or remote nodes and services. This means that every node will append itself to
systemConf.nodes[]and will ping itself according to ping mechanism, hence it will discover its own services and can.call()them.
// register a dummy service
math.register('add', (payload, resp) => {
        resp.jsonify(payload.x + payload.y)
})

math.registerClientRoute('SECRET')
math.middlewares().transport.client('SECRET').register(0, _msgConfigLogger)

// insert _msgConfigLogger into the /CALL route
math.middlewares().transport.client("CALL").register(0 ,_msgConfigLogger)

// call it. note that we must wait a sec since service discovery must resolve local node
setTimeout(() => {
  math.call({servicePath: "add", payload: {x: 1, y: 7}}, (err, body) => {
    console.log(err, body)
  })
}, 1000)
If you pay attention to your terminal, you see:
CONFIG LOGGER :: {"hostname":"127.0.0.1","port":"4000","path":"/CALL","method":"POST","json":{"userPayload":{"x":1,"y":7},"service":"/add"}}
The key path inside this object is a synonym for the route of the message, which is /CALL be default.
Now let’s see how we can sent a message to another route, using another route middleware
you can add a key named route to .call() to indicate the route of the message:
math.call({servicePath: "add", payload: {x: 1, y: 7}, route: "SECRET"}, (err, body) => {
  console.log(err, body)
})
if you run the node now, you see that path has changed in logger, but the log inside response callback has not been called. This is because SECRET.dispatch.mw doesn’t export the message. Let’s add xyz’s default _httpExport to this middleware stack:
let _httpExport = require('xyz-core/src/Transport/Middlewares/call/http.export.middleware')

math.registerClientRoute('SECRET')
math.middlewares().transport.client('SECRET').register(0, _msgConfigLogger)
math.middlewares().transport.client('SECRET').register(-1, _httpExport)
If we send the same message now, we see that:
{ Error: socket hang up ...is the output. This is because the destination node of the call({route: 'SECRET', ...}), which is the local node in this case, does not accept messages over ‘SECRET’. The default behavior of xyz’s built in HTTP server is that it drops requests to unknown routes immediately, hence we see the socket hang up error in the sender.
In order to allow requests to new routes to be received, we must add this route to the server routes which will be explained in the next section.
Using server routes
The process and syntax of adding a new server route is fairly similar to how we added an outgoing route, the only difference is that we must indicate which server we want to add the route to. The method to use is xyz.registerServerRoute(port, prefix, [gmwh]).
The first paramter is the port which will identify the server to use and the next two parameters have the same effect as xyz.registerClientRoute().
Note that in this section we avoid adding new servers and just manipulate the existing HTTP server on port 4000. In the next section, we will add new servers.
Let’s add the SECRET route the current node’s HTTP server and see how the message that we sent before will now arrive successfully.
// register a new server route
math.registerServerRoute(4000, 'SECRET')
the output of console.log(math) will be:
HTTPServer @ 4000 ::
  Middlewares:
  call.receive.mw [/CALL] || _httpMessageEvent[0]
  ping.receive.mw [/PING] || _pingEvent[0]
  SECRET.receive.mw [/SECRET] ||
But even now, the message to add will still not be responded correctly. This is because unlike /CALL, the /SECRET (SECRET.receive.mw) is empty and it will not emit any messages up to service layer. This log indicates this problem:
[node-xyz-init@127.0.0.1:4000] error :: GMWH :: attempting to call SECRET.receive.mw[0] which is not defined. teminating execution...You can use xyz’s _httpMessageEvent, which is used in /CALL be default to patch in the last component needed to complete a message over a new route.
Note that
_httpMessageEventworks with the format of messages exported using_httpExport.
let _httpMessageEvent = require('./../../src/Transport/Middlewares/call/http.receive.event')

math.middlewares().transport.server('SECRET')(4000).register(0, _httpMessageEvent)
When you first saw the syntax of
.middlewares()in getting started, with lots of dots after it, it might have looked a bit strange, but now it should make sense how with each.and(), we move into the depth of xyz-core’s layer to reach our desired middleware.
Finally, at this point the message that you have sent via /SECRET should be responded successfully.
Note that the burden of creating a new route, middleware and linking them can be encapsulated in a Bootstrap Function and this tutorial was to clear the way in detail. Aside from that, keep in mind that several routes are useful only when you want to have different middlewares applied to different messages. As an example, you might want an authentication middleware in /SECRET route but not in /CALL route.
Using new servers
So far, we have seen how to add routes, both from a client point of view and server point of view. Although, we only added routes to an existing server. We didn’t create another server.
There are two ways to add a server to your xyz node.
- using
selfConf.transport[] - using
xyz.registerServer()
Setting up a new server is just a simple step and the rest of the work has been explained in the previous section. That is to say, once we learn how to create a server on port X, you can manipulate it and add middlewares to it just as you did with the default server. The only difference is that X should be used instead of 4000 as port.
Before going into the syntax, properties of a server should be explained: Each server has:
- a port
- a type, which can be
HTTP,UDP - a boolean key named event which will indicate wether the Service layer should listen to message events on this server or not. This is crucially important because when a middleware like
_httpMessageEventsends a message over the server using_aServer.emit(...), the serviceRepository should also listen to it withserviceRepository._aServer.on(...).
Transport servers with type
HTTPSandTCPare being developed.
Creating a server from configuration
The only step needed is to append objects with keys mentioned above to systemConf:
let math = new XYZ({
  selfConf: {
    transport: [
      {type: 'HTTP', port: 4000},
      {type: 'HTTP', port: 5000},
      {type: 'UDP', port: 6000}
    ]
  }
})
and you will see the log of console.log(math):
HTTPServer @ 4000 ::
  Middlewares:
  call.receive.mw [/CALL] || _httpMessageEvent[0]
  ping.receive.mw [/PING] || _pingEvent[0]
  SECRET.receive.mw [/SECRET] || _httpMessageEvent[0]

HTTPServer @ 5000 ::
  Middlewares:
  call.receive.mw [/CALL] || _httpMessageEvent[0]

UDPServer @ 6000 ::
  Middlewares:
We do not define event here, since by default, event will always be considered true, unless explicitly defined false. To be sure of this, you should always see an info log at runtime indicating this:
[node-xyz-init@127.0.0.1:4000] info :: SR :: ServiceRepository events bounded for [HTTP] server port 4000
[node-xyz-init@127.0.0.1:4000] info :: SR :: ServiceRepository events bounded for [HTTP] server port 5000
[node-xyz-init@127.0.0.1:4000] info :: SR :: ServiceRepository events bounded for [UDP] server port 6000
As you see, each HTTP server will create one route by default, /CALL, while UDP server does not have any route.
You are encouraged to start adding routes to both servers and test them, but we aren’t going to do that now since we are going to explain them as an example in the last section of this article.
Creating server at runtime
A method in xyz-core will accept the same three parameters ans has almost the same behavior. An example that justifies why a method was also needed for adding a server is the swim ping mechanism. This ping mechanism is isolated in a bootstrap function, although it needs a UDP server and client. Having a method to add a server allows this ping bootstrap function to create new servers and routes without needing the developer to change a single line of their business logic code or config.
The method spec can be seen here. Inside your code, you can use it like:
// add a new server
math.registerServer('UDP', 7000)
math.registerServer('HTTP', 8000)
In the next section, we use this information to demonstrate how you can use these features to enable your nodes to send UDP messages through an entirely separate middleware and route. This can be actually handy because your node might want to send some important messages over HTTP, meanwhile send some less important messages using a UDP tunnel.
Wrapping it up: a UDP tunnel
Assume that we need to have a set of microservices which want to communicate with each other over a secure and reliable transport layer, without taking the chance of message drop etc. Meanwhile, our services also need to broadcast messages to all other nodes from time to time. Although using HTTP for broadcasting is possible, it does not feel right because it can jam your network due to its high message load and process. In such cases, it is a good Idea to use UDP as the broadcasting transport.
Note that we are going to do everything inside a single node process to keep things simple, but the same rules apply if you want to have this mechanism over multiple nodes. Similar to the previous section, our one microservices is going to call itself, sometimes over HTTP and sometimes over UDP.
Let’s set up the node real quick!
- We will add the new UDP server in the config, not using a method:
let math = new XYZ({
  selfConf: {
    transport: [
      {type: 'HTTP', port: 4000},
      {type: 'UDP', port: 6000}
    ]
  }
})- We set up to services to be exposed.
addis the important one andnotificationis the one that we want to send messages to using UDP
// a function that need to be called securely and synchronously, with a callback
math.register('add', (payload, resp) => {
  resp.jsonify(payload.x + payload.y)
})

math.register('notification', (payload, resp) => {
  console.log(`notification receiver ${payload} [resp ${resp}]`)
})- We create an outgoing route for UDP messages
// sender side. we need a udp route
math.registerClientRoute('UDP_BCAST')

const _udpExport = require('./../../src/Transport/Middlewares/call/udp.export.middleware')
math.middlewares().transport.client('UDP_BCAST').register(0, _udpExport)
Note that _udpExport is a middleware function similar to _httpExport. It will send a message using UDP.
- We set up the UDP server properly.
// receiving side
// need a UDP server with the same route name
math.registerServerRoute(6000, 'UDP_BCAST')

const _udpMessageEvent = require('./../../src/Transport/Middlewares/call/udp.receive.event')
math.middlewares().transport.server('UDP_BCAST')(6000).register(0, _udpMessageEvent)
By this point, when you run the node you should see this in console.log(math)
____________________  TRANSPORT LAYER ____________________
Transport:
  outgoing middlewares:
    call.dispatch.mw [/CALL] || _httpExport[0]
    ping.dispatch.mw [/PING] || _httpExport[0]
    UDP_BCAST.dispatch.mw [/UDP_BCAST] || _udpExport[0]

  HTTPServer @ 4000 ::
    Middlewares:
    call.receive.mw [/CALL] || _httpMessageEvent[0]
    ping.receive.mw [/PING] || _pingEvent[0]

  UDPServer @ 6000 ::
    Middlewares:
    UDP_BCAST.receive.mw [/UDP_BCAST] || _udpEvent[0]
Seems correct.
- Finally, we write the code to send messages
// default call
setTimeout(() => {
  math.call({
    servicePath: 'add',
    payload: {x: 1, y: 7}
  }, (err, body) => {
    console.log(`add => ${err}, ${body}`)
  })
}, 5000)

// broadcast call
// will use a new send strategy and udp
const _broadcastGlobal = require('./../../src/Service/Middleware/service.broadcast.global')
setInterval(() => {
  math.call({
    servicePath: 'notification',
    payload: 'STH HAPPENED!',
    sendStrategy: _broadcastGlobal,
    route: 'UDP_BCAST'
  }, (err, msg) => {
    console.log('sender', err, msg)
  })
}, 1000)
As you see, in the second .call() we are using _broadcastGlobal as sendStrategy. This middleware will broadcast the message to all nodes in the system, regardless of the path of the service. Also, we are using UDP_BCAST as the outgoing route, so that the message will be sent over UDP.
We are ready to lunch! Run the node process.
You should notice that the only log the we are seeing is
addbing called, loggingadd => null, 8every 5 second- sender callback of
notification, loggingsender null { '127.0.0.1:4000:/notification': [ null, '86 bytes sent' ] }
The first log is as we expect. But the second one seems flawed. One thing that you should keep in mind is that UDP messages are Asynchronous, meaning that the sender will not wait for their response. In other words, the second argument of .call() when udp export is being used is not the response of the callee, its just a callback indicating that the messages has been successfully sent. We don’t whether it has been received or not, and we don’t wait for the callee to respond. This is the nature of UDP, right?
So, apparently the second log is also rationale. The main problem now is that
math.register('notification', (payload, resp) => {
  console.log(`notification receiver ${payload} [resp ${resp}]`)
})
is never being called.
We can give you the answer and the missing part right away, but let’s use this problem as an excuse to debug an xyz node.
One good way to debug xyz is to reduce the log level to basic matters (Logging is explained with more detail in a different page). xyz used info log level by default. You can verify this by seeing the logLevel field in selfConf. As a first step, let’s reduce log level to verbose. Furthermore, let’s not touch a single line of code and used command line arguments to change to log level. Run the node with $ node math.ms.js --xyz-logLevel verbose
New messages will pop out. Let’s investigate them.
-
Every 5 second, you see:
verbose :: FIRST FIND :: determined node for service /add by first find strategy : 127.0.0.1:4000:/add. This the main HTTP message being routed to127.0.0.1:4000for service/add.Immediately afterwards, you should see
verbose :: SR :: ServiceRepository received message for service /add.This is the receiving side of the message, after the message has been sent over the local network to
127.0.0.1:4000(which is ironically the sender in this case).And after that you should see
add => null, 8 -
Every 1 second you should see:
verbose :: BROADCAST GLOBAL :: sending message to 127.0.0.1:4000:/notificationwhich is the broadcast middleware doing what is was supposed to do.
So where is the flaw? You should keep in mind that the BROADCAST GLOBAL is doing its job correctly. It is a Service middleware and from the service point of view a node with identifier 127.0.0.1:4000 is the target of /notification.
Let’s reduce the logLevel to debug and see the problem. We will only focus on the logs before sender null { '127.0.0.1:4000:/notification': [ null, '86 bytes sent' ] } which are related to udp messages.
verbose :: BROADCAST GLOBAL :: sending message to 127.0.0.1:4000:/notification,
debug :: Transport Client :: sending message to 127.0.0.1:4000/UDP_BCAST through UDP_BCAST.dispatch.mw middleware
sender null { '127.0.0.1:4000:/notification': [ null, '86 bytes sent' ] }
Although the service layer was doing its job correct, you can now see that the Transport layer is not. This is because Transport layer, unlike service layer is not independent of the Transport mechanism and should not rely on the identifier. In the debug log we are seeing that the message is being sent to port 4000 of the receiver (sending message to 127.0.0.1:4000/UDP_BCAST through UDP_BCAST.dispatch.mw middleware). In other words, the message is being sent to the wrong port of the correct node.
This issue is because xyz nodes are allowed to have multiple servers, hence multiple ports, meanwhile they should have just one identifier for the service layer. Hopefully, it has been mentioned in the spec. of ping mechanisms that one of their duties is to keep track of each node’s routes and servers. This can enable Transport layer to automatically fix this issue. But, the Transport layer will do so only when you tell it to do so. How? let’s see.
Message redirect
To solve the issue we can use the redirect optional key in .call() This key, if defined true will Double check the message route with the destination port determined by the service layer. In other words, if the sendStrategy determined that 192.168.0.15:7000 is the target node of a message, the transport layer will not blindly send the message to 192.168.0.15:7000. It will check the message’s route and see which server of 192.168.0.15, on which port, has a accepting route that matches the messages route.
If you imagine what redirect is doing, it’s not hard to infer this constrain on routes to keep redirect working:
All routes of all servers within a node should be unique. As a counterpart, assume that a node with identifier X.Y.Z.Q:3000 has has route
FOOin both X.Y.Z.Q:4000 and X.Y.Z.Q:5000. canredirectdecide correctly?
Change the sender of the message to
math.call({
    servicePath: 'notification',
    payload: 'STH HAPPENED!',
    sendStrategy: _broadcastGlobal,
    route: 'UDP_BCAST',
    redirect: true
  }, (err, msg) => {
    console.log('sender', err, msg)
  })
and launch again. As you see, the receiver log (console.log('notification receiver ${payload} [resp ${resp}]')
) will be resolved to
receiver STH HAPPENED! [resp undefined]The fact that resp is undefined further proves that udp messages are async. In other words, you can not respond to the directly since the sender is not waiting for any response. So, no resp.send or resp.jsonify in this case.
We are done with this tutorial! You can find more information in API doc of classes that are relevant to this topic, such as
The code of this tutorial is tested and maintained here