CONTENTS
Hello XYZ
This brief tutorial will help you get started with XYZ. Although it’s a Getting-Started tutorial, but it also covers a great deal of fundamental information.
The only dependency of this tutorial is xyz-core, which has only one logging dependency itself. You can install it in your woking directory using:
$ npm install xyz-core --save
The code and test cases of this documentation is available here.
Let’s get this tutorial started!
Baby Microservice
Assume that we only have two services that will communicate with each other. Suppose that each of these services (aka. Node modules) have another API exposed two end users. That is not our business at the moment, since XYZ will divide the matter of end user and the matter of system. This means that although you can have end user calling the APIs created in this tutorial, their main goal is to serve other nodes inside your own system. In this section, our goal is to focus on what is important to our own system.
The – dummy – services are as follows:
// math.ms.js
// a very fancy math module with super fast calculation
function add(x, y) {
  return x + y
}

function mul(x, y) {
  return x * y
}

// string.ms.js
// some ultra fast string manipulations
function up(str) {
  return s.toUpperCase()
}
function down(str) {
  return s.toLowerCase()
}
Note that these functionalities are, of course, way to small and naive to be exposed as a standalone service, even in a microservice architecture. But we will stick to these services, Math and String in some of our tutorial to keep things simple.
Now, assume that these services need to call each other in order to share their services, or more realistic, in order to do something for the end-user. This is the first place that XYZ will come to action.
In order to have two xyz instances communicate with each other, they need to have a system, a shared system. Information about the system is filled to the xyz instance using a config parameter. The config parameter has information such as local port/ip/service name and a list of nodes who live inside the system. Note that a node can join the system without being in the static list (more on this later), this is just a basic example!
Our two services are going to be deployed with the following topology:
math.mswill be hosted on port 4000 of the local machinestring.mswill be hosted on port 5000 of the local machine
Therefore, we need to pass the address of the other node to each of the nodes. This will be placed inside systemConf.nodes.
Let’s look at the math.ms.js first:
// math.ms.js
// a very fancy math module with super fast calculation
let XYZ = require('xyz-core')

let mathMS = new XYZ({
  selfConf: {
    // will indicate the name of the sevice in logs
    name: 'math.ms',
    // default hostname
    host: '127.0.0.1'
  },
  systemConf: {
    // list of other addresses
    nodes: ['127.0.0.1:5000']
  }
})

// expose these function over the system

mathMS.register('mul', (payload, response) => {
  response.jsonify(payload.x * payload.y)
})

mathMS.register('add', (payload, response) => {
  response.jsonify(payload.x + payload.y)
})
Strange thing is that we did not tell math.ms to place itself on port 4000. Why?
Each node will load itself with one HTTP server on port 4000 by default. You can read more about thr default values in Configuration section and more about Servers in Server Management section
And the string.ms is fairly similar. We expose some functions relating to string objects. The most important difference is that now we must explicitly tell string.ms to listen on port 5000. This can be done using the selfConf.transport[] array.
//string.ms.js
let XYZ = require('xyz-core')

let stringMS = new XYZ({
  selfConf: {
    name: 'string.ms',
    host: '127.0.0.1',
    transport: [{type: 'HTTP', port: 5000}]
  },
  systemConf: {
    nodes: ['127.0.0.1:4000']
  }
})
stringMS.register('up', (payload, response) => {
  response.jsonify(payload.toUpperCase())
})
stringMS.register('down', (payload, response) => {
  response.jsonify(payload.toLowerCase())
})
Now, if you run both math.ms.js and string.ms.js, you’ll notice that… well, nothing is yet happening because we didn’t write any code for anything to happen! We will add some code in a minute to have one service calling the other one.
I see an error:
[math.ms@127.0.0.1:4000] error :: Ping Error :: 127.0.0.1:5000 has been out of reach for x pings :: ...
This is natural. XYZ has a built in and configurable service discovery mechanism out of the box. You can disable it of course, but it will work by default. This is error is because each node will iteratively check other node’s health by pinging it and the reason you are seeing this is because string.ms was not able to respond to a ping message. This error should go away as you run string.ms
notes about the default ping: XYZ offers a few ping strategies, explained in a different section (Ping Types). The default ping is a naive, yet reliable approach which is easy and appropriate to use in test environmetns. Using the default ping, each node will probe other nodes and wait for a response. If a node is out of reach for 10 pings, it will be removed from the
systemConf.nodes[]. The default interval for pinging is 2000ms.
Moving away from all that ping stuff. Now, thanks to the service discovery mechanism, our services are virtually binded to one another and they can call the services that each of them is exposing using .register(). The good part of .register() is that the callee is transparent to the location of this function (or at least, has the option to be) and can call it very easily. Let’s see how:
Add the following to string.ms.js:
setInterval(() => {
  // .call will invoke a foreign (or even local) service exposed using .register
  // servicePath must be identical in caller and callee
  stringMS.call({servicePath: 'mul', payload: {x: 2, y: 5}}, (err, body, res) => {
    console.log(`response of mul => ${body} [err ${err}]`)
  })
}, 2000)
You should now see an output like:
response of mul => 10 [err null]
A Note on terminology.
Before going any further, it is important to be on the same page regarding terminology.
- SERVICE : each function – or literally any piece of code – exposed via
.registeris a service. - NODE : Each Node Process, having a number of services exposed using
xyz-coreand.register()is called a node.
What’s next?
In this example we hardcoded the list of service, so that they can communicate with each other. This is… just about ok. It is not awesome. What would be awesome is to have nodes joining the system dynamically. Yes, that’s what we’re going to do in the Next Section. Aside from being way less Cool, having a fixed list of nodes in a [micro]service based architecture is almost useless. There is a pretty good chance of having new nodes, or seeing existing nodes crash or restart. We can not achieve a proper service discovery using a fixed list of nodes.
Furthermore, you can even test this flaw in the current system. If you kill math.ms, you’ll seee immediatly that the response of .call() changes to null. And the sad part is that if you do not re-lunch math.ms before 10 ping cycles is over, string.ms will remove it from its systemConf (literrly, it will forget about math.ms and remove all of its information. like a sad break-up) and there is no coming back from this. (just kidding. there is a way called seed nodes and we will get to it soon)
Replicating Your Nodes and Services
In the end of the last section, we reached a conclusion:
It would have been much more interesting, if we could add nodes dynamically. Good news: we can.
XYZ nodes can join a system, given that they have a [list of] seed node[s]. Seed nodes are the entry point to the system. They should check the authority of the incoming node, if required, and pass the list of nodes available inside the system to it, or any other authentication certificate, again, if required. The fact that there are a lots of ‘ if required ‘ phrases in the last statement is that all of these steps (like any authentication or certificate exchange) are optional and the developer can choose to have them. In the most Wildcard-ish scenario, all nodes are open to accpeing join requests and any other node can join them only by knowing their IP address.
This Join Mechanism is a subset of the Ping Mechanism. In other words, every ping mechanism should implement how and when join requests should be accepted. Since the default ping is pretty naive and focuses of test and developement phases, it does not enforce any authentication. Albeit, we will see in the end of this tutorial that we can modify this behaviour with some small changes.
Let’s assume that both the string.ms and math.ms in the previous section do not know each other beforehand. That is to say, their systemConf.nodes[] is empty:
let stringMS = new XYZ({
  selfConf: {
    name: 'string.ms',
    host: '127.0.0.1',
    transport: [{type: 'HTTP', port: 5000}]
  },
  systemConf: {nodes: []}
})
and
let mathMS = new XYZ({
  selfConf: {
    name: 'math.ms',
    host: '127.0.0.1'
  },
  systemConf: {nodes: []}
})
Note that you can omit putting the empty
nodes: []in your config file. In fact, you can initialize youre system usingnew XYZ({}). See the Configuration section for more information about the default valuse.
Furthermore, let’s assume that the math.ms is the constant node in the system and string.ms’s are going to come and go. Go ahead and run the math.ms.js alone, you will see that nothing happens. It’s ok. math.ms does nothing.
Now run the string.ms.js. you’ll see:
[2017-3-6 16:11:30][string.ms@127.0.0.1:5000] warn :: Sending a message to /mul from first find strategy failed (Local Response)
response of mul => null [err Not Found]
The first find strategy is a default behavior embedded inside node XYZ for finding nodes to send messages to. In more advanced sections of this documentation, you’ll learn that the sendStrategy is actuallya middleware in xyz-core. This enables you to change any function inside the middleware at runtime. More on this later!
The main point is that the message failed. Obviously because string.ms does not know any math.ms at this point, so it does not actually send the message to the network and instead, it will locally respond to it with en error.
Change the string.ms.js to the following, specifying a new seed node for it.
let stringMS = new XYZ({
  selfConf: {
    name: 'string.ms',
    host: '127.0.0.1',
    // new parameter
    seed: ['127.0.0.1:4000'],
    transport: [{type: 'HTTP', port: 5000}]
  },
  systemConf: {nodes: []}
})
Note that you do not need to chnage math.ms.js at all. Joining is a part of Ping and pings a er configured using a different approach (if you are curious, using Bootstrap Functions), not using the xyz constructor.
Now, the two nodes have no previous knowledge of each other, yet they can join and work with each other. Go ahead and run the math.ms, next run the string.ms in a separate terminal and see the results. As you see, the output is still the same. You might also see a info log indicating that join has been successfully approved.
in string.ms.js:
[string.ms@127.0.0.1:5000] info :: JOIN PING ACCEPTED. response : ...
in math.ms.js:
[math.ms@127.0.0.1:4000] info :: A new node {127.0.0.1:5000} added to systemConf
This get’s even more interesting when we add more nodes. You can add more string.ms nodes and see that all of them will eventually find the math.ms and can connect with it. To be more accurate, the do not just find math.ms, they find all of the nodes in the system, including the previously deployed string.mss.
To test this, there is only one small problem. All string.ms ss are configured to use one port. Hopefully, XYZ provides a way to override any configuration, for debugging purposes mainly. We’ll cover this later (see [Configuration] for more detail), but, for now, you can use the --xyz-transport.0.port command line argument to override the port. Run many many more StringMS instances with:
$ node string.ms.js --xyz-transport.0.port 5001
$ node string.ms.js --xyz-transport.0.port 5002
$ node string.ms.js --xyz-transport.0.port 5003
...
The
--xyzprefix is backdoor for overriding any value inselfConf. Keeping this in mind, I think you can find the relation between--xyz-transport.0.port 5001andselfConf : {transport: [{type: 'HTTP', port: 5001}]}
All of your logs should indicate that all string.ms nodes are calling mul successfully and all nodes should be logged joined in math.ms.
A question might come to mind at this point. We have many sender nodes, and only just one receiver node in this example. So… it is kinda obvious how each request gets routed. In other words, a string.ms does not have that much of an option!
Assume that we have two receiver nodes (math.ms) and a dozen sender nodes, how could we decide on one of the math.ms nodes?
You might argue that this is a matter that xyz should handle. Indeed, we do handle it. it’s just that we are very keen to keep you involved whit what’s happening under the hood, so that you can change it when required.
In order to have different message routing ways, xyz supports two mechanisms:
- Service Discovery middlewares
- Path based service identification
The upcoming sections will describe these concepts.
Before going into the next section, you might argue that why is this so important? In a microservice-based system, it is crucially important!
If you think about the system as a whole, you come to realize that many many types of messages might be sent. One node might want to broadcast a message to all other nodes, or to a subset of them. A node might want to apprise just a few database nodes about a record update, and many many more events that might happen!
Service Discovery
As mentioned in the previous section, the process of choosing a destination node when making a call is rather difficult and obscure. XYZ provides a configuration for each of the nodes, so that each node can actually choose a strategy for sending a message. Note that each node can have its own sendStrategy.
The good thing about the sendStrategy is that it is a plugin (aka. middleware). these middlewares are completely modifiable. That is to say, you can write your own strategy and patch it into your system.
Although one of the reasons for having send strategies as a plugin is to keep the main repository minimal ,xyz-core has a few fundamental send strategies built in:
- xyz.first.find . Note that this is the default sendStrategy.
- xyz.send.to.all
- xyz.send.to.target
- xyz.broadcast.local
- xyz.broadcast.global
In this tutorial we are only interested in the first two.
We will avoid going into the code of these middlewares(although they are fairly simple and you can probably get a feeling by seeing the source code), but it is crucially important to understand exactly what they are doing.
The sendStrategy middleware has the following main duty:
it must receive all of the parameters that you pass to
.call(), with some additional information thatxyz-coreinjects to it, and pass this message request to theTransportlayer.
(You will soon understand clearly what the Transport layer is. For now you can assume that it handles network messages.)
In other words, (at least using xyz.first.find) you never call a service by specifying its exact ip:port. This information will be discovered using sendStrategy. (awkward side note: xyz.send.to.target is a sendStrategy middleware that accepts the ip and port of the destination from you and redirects the message exactly to that node, regardless of any other information)
In order to investigate the last sentence better, let’s verbally describe how xyz.first.find does its duty:
- After you send a message using
.call(), the send strategy function will be invoked. this function has access to all of the parameters of.call()and some additional data. - One of these additional data, is list of functions exposed by all of the nodes in the system. This information is persisted throughout the system during ping calls.
- Assuming that you called a service with
{servicePath: 'foo'},xyz.first.findwill then search this list and find all of the nodes that have enlistedfooas on of their functions. - Finally it will invoke the Transport layer with the ip and port of the first node in the list that can response to this message. (and the rest of the job will be carried by the Transport layer middlewares).
The send.to.all works in similar manner, but it will send the message to all of the nodes that have foo as an exposed service.
XYZ is configured to work with first find by default. if you wish to change this, a new key named defaultSendStrategy should be added to the selfConf key passed to xyz constructor. Built in middlewares can be imported from xyz-core/built/Service/Middleware/[...]. Let’s set send.to.all function for string.ms.js:
let stringMS = new XYZ({
  selfConf: {
    name: 'string.ms',
    host: '127.0.0.1',
    seed: ['127.0.0.1:4000'],
    defaultSendStrategy: require('xyz-core/built/Service/Middleware/service.send.to.all'),
    transport: [{type: 'HTTP', port: 5000}]
  },
  systemConf: {nodes: []}
})
Again, the code of math.ms does not have to change at all. In fact, math.ms does not care about any of this, since it’s sitting in the receiving side of this scenario.
Before going any further, you can see at this very point that send.to.all has had some effetcs!. run one math and one string service and see the difference in the response. Since send.to.all assumes multiple messages are being sent, it also returns an object of responses in return:
response of mul => {"127.0.0.1:4000:/mul":[null,10]} [err null]
So if we run three math.ms instances, send.to.all finds three target nodes and we expect to receive an object with three keys in return, each indicating the response of that node!
Let’s run 3 math services, and a dozen of string services. The configurations are similar to the previous section. string.ms has send to all as sendStrategy and 127.0.0.1:4000 as seed node.
You can run your services in the following order:
//default math at port 4000
$ node math.ms.js

//default string at port 5000
$ node string.ms.js

// more string on different ports
$ node string.ms.js --xyz-transport.0.port 5001
$ node string.ms.js --xyz-transport.0.port 5002
at this point, each string will have receive a response like:
response of mul => {"127.0.0.1:4000:/mul":[null,10]} [err null]
As you add more math.ms to the system, all information regarding join event will be propagated to the system and string.ms will receive more and more response!
//note that these new instances must have a seed node,
//otherwise they can not find the rest of the system!

$ node math.ms.js --xyz-transport.0.port 3999 --xyz-seed 127.0.0.1:4000
$ node math.ms.js --xyz-transport.0.port 3998 --xyz-seed 127.0.0.1:4000
$ node math.ms.js --xyz-transport.0.port 3997 --xyz-seed 127.0.0.1:4000
Similar to how we can override the port number, a single seed node can also be added by command line argument using the --xyz prefix.
At this point, you should expect to see:
response of mul => {
  "127.0.0.1:4000:/mul":[null,10],
  "127.0.0.1:3998:/mul":[null,10],
  "127.0.0.1:3997:/mul":[null,10],
  "127.0.0.1:3999:/mul":[null,10]
}
in each array response, the first index is the error and the second one is the actual response.
In fact, if you close one of the math.ms nodes, you’ll see the response to be:
Assuming tht you kill math.ms@127.0.0.1:3998:
response of mul => {
  "127.0.0.1:4000:/mul":[null,10],
  "127.0.0.1:3998:/mul":[
    {"code":"ECONNREFUSED","errno":"ECONNREFUSED","syscall":"connect","address":"127.0.0.1","port":5001},
    null
  ],
  "127.0.0.1:3997:/mul":[null,10],
  "127.0.0.1:3999:/mul":[null,10]
}
Note that each xyz node will kick out-of-reach nodes after a certain threshold. You can learn more about it in the Ping Types.
As you see, the first parameter is the error and the second parameter is the response. This happens because each node will not immediately assume that an other node is offline after one failure, so it will keep sending the message to it. If you wait for 10 ping, you will see that all nodes will eventually update their systemConf and will not send any message to this node.
Another interesting send strategy that you might want to implement and test is majority function. You can change the send.to.all in a way that it will send the message to all accpetable nodes, will wait for all responses, and will return with a single result, if all if the responses from different services were the same. If not, it will return an Error. Who knows, maybe you actually use this Microservice to do floating point calculations. Each machine handles floating point differently and the responses might actually differ!
Note that you can also pass the send strategy per call. This will override whatever send strategy you have already chosen in selfConf:
let sendToAll = require('xyz-core/built/Service/Middleware/service.send.to.all')
let firstFind = require('xyz-core/built/Service/Middleware/service.first.find')
setInterval(() => {
  stringMS.call({servicePath: 'mul', payload: {x: 2, y: 5}, sendStrategy: sendToAll}, (err, body, res) => {
    console.log(`response of mul => ${JSON.stringify(body)} [err ${err}]`)
  })

  stringMS.call({servicePath: 'mul', payload: {x: 2, y: 5}, sendStrategy: firstFind}, (err, body, res) => {
    console.log(`response of mul => ${JSON.stringify(body)} [err ${err}]`)
  })
}, 1000)
Path based service identification
Aside from Service discovery middlewares, xyz provides yet another way to make service invocation even more flexible. It’s called Path Base service identification. That is to say, each service (aka. function) that you expose, will be exposed on a certain path on that process. So far we have used a plain string as the service name. The truth is that those were paths too! XYZ has been adding a single / to each of them. Recall one of the logs printed from the previous section. Look at it again:
"127.0.0.1:4000:/mul":[null,10]}
As you see, the actual identifier of the service is actually: [IP]:[PORT]:/[PATH].
Recalling from the last section, The [IP]:[PORT] portion of this identifier must be discovered and decided upon in the sending side, the caller. Once the IP and PORT has been resolved using a send strategy, the message will be sent to that node. The last part of the address, the :/[PATH], will be used at the receiving side, which help the callee decide whihc of its exposed functions to invoke.
Of course, this does not separate these two identifiers entirely. As an example, in first.find, the sender must be aware of the PATH of services exposed by other nodes, while send.to.target will send a message to a specific IP:PORT regardless of the PATH.
As a naive example, let’s assume that our math service is super accurate and can add floating point numbers up to thousands digits of accuracy. But we don’t want to waste resource on simple integer calculations. Hence, we will divide our services into to section:
decimal/add
decimal/mul

float/add
float/mul
Applying this turns out to be very easy!
Change the first parameter, the Path, of each function is math.ms:
mathMS.register('decimal/mul', (payload, response) => {
  response.send(payload.x * payload.y)
})

mathMS.register('decimal/add', (payload, response) => {
  response.send(payload.x + payload.y)
})

mathMS.register('float/mul', (payload, response) => {
  // let's add the float casting, just fore sake of our example!
  response.send(parseFloat(payload.x * payload.y))
})

mathMS.register('float/add', (payload, response) => {
  response.send(parseFloat(payload.x + payload.y))
})
If you run the stringMS now, it will get only null. This is natural because it is looking for /mul, while it only knows /decimal/mul.
Next, change the call path in stringMS:
setInterval(() => {
  stringMS.call({servicePath: '/decimal/mul', payload: {x: 2, y: 5}}, (err, body, res) => {
    console.log(`my fellow service responded with ${JSON.stringify(body)}`)
  })
}, 2000)
As you see, now we get the same result.
The main purpose of paths is to allow:
- better grouping and organization among services.
- allow more meaningful names and identification
- allow multiple calls at once -Wildcard-:
Let’s see all of these in action! We will use the same configuration like the previous section.
First, let’s have string.ms make two message calls:
setInterval(() => {
  stringMS.call({
    servicePath: '/decimal/mul',
    payload: {x: 2, y: 5},
    sendStrategy: firstFind
  },
  (err, body, res) => {
    console.log(`/decimal/mul [firstFind] => ${body} [err ${err}]`)
  })

  stringMS.call({
    servicePath: '/decimal/*',
    payload: {x: 2, y: 5},
    sendStrategy: sendToAll
  },
  (err, body, res) => {
    console.log(`/decimal/* [sendToAll]=> ${JSON.stringify(body)} [err ${err}]`)
  })
}, 1000)
Before testing this, let’s try and understand how it is going to work:
The first call is lucid. we try to find /decimal/mul in a node using firstFind which will eventually find one node that can respond to this.
But in the second case, you should know somethings beforehand. Specifically talking about sendToAll, this sendStrategy will take into consider both the IP:PORT and PATH. In other words, it will first resolve the path, if it contains *. Next it will iterate over nodes and find those who can respond to a specific path.
Taking this into account, in the second case, /decimal/* will first translate into [decimal/mul, decimal/add]. Next, all possible target nodes for each of these paths will be resolved and the message will be sent to all of them.
With these explanations in mind, the output of the previous double call is:
/decimal/mul [firstFind] => 10 [err null]
/decimal/* [sendToAll]=> {
  "127.0.0.1:4000:/decimal/mul":[null,10],
  "127.0.0.1:4000:/decimal/add":[null,7]}
Note that this example is working only because we are using
service.send.to.allas send strategy is second call.first.findwould simple call either one of/decimal/addor/decimal/mulin only one of possible nodes
Go ahead and try things like */mul or even /*/*.
It would be helpful to mix the this section and the last one. Go ahead and run a few math.ms nodes and a single string.ms node with sendToAll as sendStrategy and see the output.
Note on valid Paths and wildcards
Currently, XYZ path parser only supports characters and wildcards in paths. That is to say, when creating a new service, the valid regex is:
/^(\/([a-zA-Z]|[1-9]|\*)+)*$/
and when calling a service, you can only call definite paths or full-wildcards. abc/*/abc is valid, albeit abc/ab*/abc is not. This is a work in progress and will change in the upcoming version.
Middlewares
Middlewares are nothing new to you. You have already seen them. send.to.all was a simple middleware in xyz system. In this section we are going to get into the details of middleware and use them to develop an authentication mechanisms.
Middlewares and Layers in XYZ
So far, our system has been plain open! No authentication. That is not good. The good news is that XYZ does not provide any authentication mechanisms by default. You heard me, No authentication mechanisms. As opposed to application-dependent steps like authentication which are not compulsory in xyz, middlewares are. That is to say, whatever happens, requests will go through a middleware in xyz.
In order to understand the place and organization of middleware in xyz, you should get a bit more familiar with it.
XYZ consists of 3 main layers.
xyz-core,Service-RepositoryandTransport. The pipeline that will conevy a message from one layer to another is a middleware.
Middleware Stacks
Middlewares are implemented using the GenericMiddlewareHandler Class in XYZ. this class will register an array of functions and passes an object (aka. parameters) through this array of middlewares.
MiddlewareStack : [Function, Function, Function, ... , Function]
As an example, Whenever a request is received and parsed in Transport Layer, a middleware function will pass it to the Service repository layer. This action will happen in the last function placed in the last index of this middleware in Transport layer.
This enables us to prepend / append more functions to this array and perform any type of pre/post process on every request. After seeing the syntax structure of each middleware in the next section, we will actually use this to add a generic authentication middleware to our system.
Middleware Stacks in XYZ
The overall structure of xyz, in the simplest form can be explained like this:
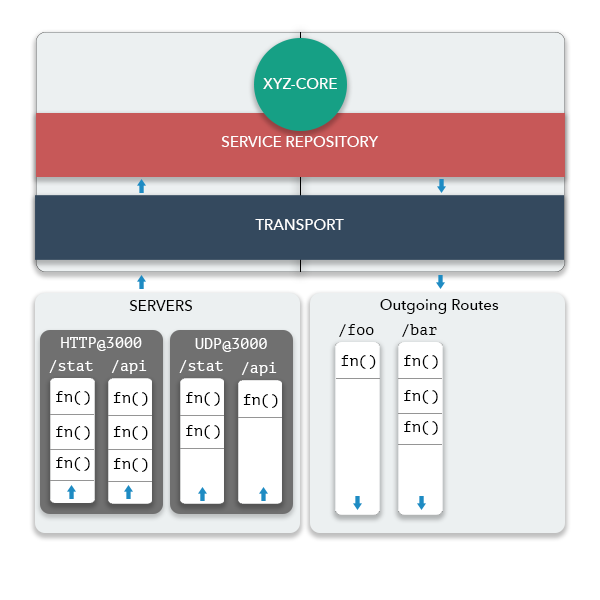
Although it is good for you to have a glimpse of some components like multiple servers and routes, this image is too complicated for this tutorial. Let’s relax this into something simpler:
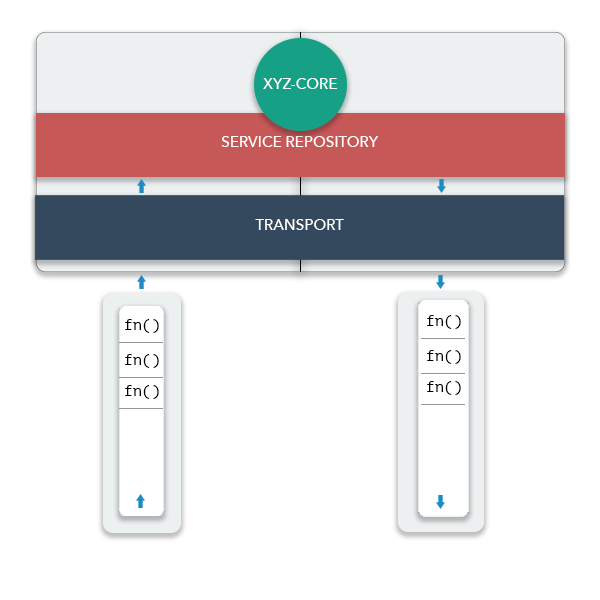
Let’s see how these components behave when you send or receive a message:
1) Sending a message
Whenever you send a message, the following steps will be taken:
- You invoke the
.call(), which lives inxyz-corelayer. (Basically, all of the functions that you might need to use directly live inxyz-core) xyz-corewill then pass this message toservice-repositorylayer. service-repository will then pass the message to a send strategy function in order to resolve the destination node of this message. this sendStrategy function should also invoke theTransportlayer.- The
Transportlayer itself does not do much! It’s the middlewares of Transport layer that do most of the job. Almost immediately, the Transport layer will pass the message to an Outgoing Middleware Stack. This outgoing middleware stack will apply all kinds of processes over the message object, and finally, in the last function of this middleware stack, the actual http call will be made and the message will be exported.
2) Receiving a message
Whenever you receive a message, the following steps will be taken:
- A Transport Layer Server (HTTP by default) will parse the message, including body and will convert it to a standard format.
- This message will then be passed to a Server Middleware Stack for further processes.
- Similar to sending a message, you can add functions to this stack for extra process, but, nonetheless, in the last function of this Middleware Stack, a function will pass the message to
Service-Repositorylayer (using Node’sEventEmitterclass). - Service-Repository will then parse the message, extract its
servicePathand invoke the appropriate function, if any.
xyz-core overrides the console.log function and whenever you log an instance of the xyz-core, all of its components will be displayed. Now is a good time to see this and relate these printed information to what we have already learned.
Add the following to math.ms.js in the last line:
console.log(mathMS)You are expected to see the following as output:
____________________  GLOBAL ____________________
selfConfig:
  {
  "name": "math.ms",
  "defaultSendStrategy": "./Middleware/service.first.find",
  "logLevel": "info",
  "seed": [],
  "transport": [
    {
      "type": "HTTP",
      "port": "4000",
      "event": 1
    }
  ],
  "host": "127.0.0.1",
  "defaultBootstrap": true,
  "cli": {
    "enable": false,
    "stdio": "console"
  }
}
systemConf:
  {
  "nodes": [
    "127.0.0.1:4000"
  ]
}
Bootstrap Functions:
  _basicPingBootstrap
____________________  SERVICE REPOSITORY ____________________

Middlewares:
  service.discovery.mw || firstFind[0]
Services:
  anonymousFN @ /decimal/mul
  anonymousFN @ /decimal/add
  anonymousFN @ /float/mul
  anonymousFN @ /float/add

____________________  TRANSPORT LAYER ____________________
Transport:
  outgoing middlewares:
    call.dispatch.mw [/CALL] || _httpExport[0]
    ping.dispatch.mw [/PING] || _httpExport[0]

  HTTPServer @ 4000 ::
    Middlewares:
    call.receive.mw [/CALL] || _httpMessageEvent[0]
    ping.receive.mw [/PING] || _pingEvent[0]
Now, some of these information are new to you, and we don’t want to focus on them for now. We just want to verify what we already learned.
In GENERAL section you can see most of the information that you pass to the XYZ constructor. Those that are new are the default values for the information that you skipped. transport[], host, defaultSendStrategy are some of the keys that you are familiar with them.
In TRANSPORT LAYER section you can the list of all of the function that you have exposed using .register(). Also, you see a component called service.discovery.mw. This middleware, by default has only one function, which is firstFind. Whenver you change the sendStrategy, this function will change (change the defaultSendStrategy in selfConf and see this log again!)
Note: at current state of xyz, the Service-Repository’s
service.discovery.mwcan have only one function[Version 0.4.0]. Note: Service-Repository’s ‘service.discovery.mw’ can now have more than one function and it acts like all other middlewares. Please see this page for more info
Looking further into TRANSPORT section, we can find some more relevant information. You can see that each node has a number of outgoing message middlewares and a number of servers, each of them having a number of server middlewares, each for one route. For now, you can ignore the routes mentioned in the log. xyz uses the default /CALL route for all messages sent using .call() and /PING route is used by the default ping.
Focusing on the /CALL section, in the outgoing section you can see that outgoing middlewares currently have only one function, _httpExport. This function will immediately export a message using a HTTP message. As an example, you will learn in Routes and Servers section that you can replace this function with something like _udpExport.
In the Server section of TRANSPORT you can see that the middleware of /CALL has only one function by default, the _httpMessageEvent which will invoke the Service-Repository layer. This means that whenever math.ms receives a message from another node, it will immediately pass it to the service layer and no extra process is done.
The main power of xyz in allowing configurability is the fact that you can always manipulate all of the middleware stacks.
Due to the fact that critical actions such as passing a request object to the upper/lower layer or passing a request out to the HTTP layer happen in middleware, it is crucially important to be very careful with them. Specifically, some middlewares are placed in xyz by default. They should remain in their place, unless you have a good reason to remove them.
Knowing these information about the architecture of xyz, we will now use our knowledge to manipulate a middleware and add custom function it.
Middleware syntax
As mentioned above, each middleware is nothin but a function. Although you are the write of middlewares in most cases, you are not the one who invokes them, xyz-core is. Hence, xyz-core will decide which parameters will be passed to each middleware.
xyz-core calls each Middleware function with the following parameters:
params: an object which contains information about the message. This parameter can be slightly variable depending on the place of the middleware. As an example, a HTTP server will invoke a Middleware function with different parameters than a UDP server.next: function that will ignore the rest of the execution of this middleware and invoke the next function in the stack.end: will end of the execution of the entire stack.xyz: a reference to the current xyz object. This is useful because all of the information required, such as configurations, Service-Repository layer etc. can be accesses from this object.
In the following section, we will focus on writing a dummy logger receive middleware for HTTP server.
In order to see the value of message, we can always see the source code or the API DOC. In this document, we will explain the details for clarification. Each server will emit its middleware stack with objects of a single type only: xReceiveMessage, which has the ITransportReceivedMessage interface. This object will contain the following keys:
export interface ITransportReceivedMessage {
  message: any
  serverId: object
  meta: object
  response: () => void
}
where
.message: the payload of the message. Most of the time, it is an object with two keys:userPayloadandxyzPayload. The former is the data that the user-code passes to the message and the latter is information that xyz attaches to the message..response: the response object..serverId: identifier of the server receiving this message..metaother variable information. As an example, in http messages this.xReceiveMessage.meta.requestis a reference to the request object, which is taken from the node’s native http module.
Keeping this ideas in mind, let’s write a simple logger middleware:
let _dummyLogger = function (xReceiveMessage, next, end) {
  console.log('i was called! now what?')
  console.log(`LOGGER :: http message received on port ${xReceiveMessage.serverId} with body ${JSON.stringify(xReceiveMessage.message)}`)
  next()
}
module.exports = _dummyLogger
You should check the values of xReceiveMessage.serverId and xReceiveMessage.message and justify their veracity.
This is the minimum structure required for each middleware. We expect this middleware to be called per each http message and it should log some information about it.
Next, let us see how we can insert this dummy logger to the system. Each middleware provides a method for inserting a function to a specific index of it. The tricky part is accessing that middleware. Since middlewares can be numerous, xyz-core does not provide a generic function for inserting middlewares (something like MathMS.insertMw(...)). This is because xyz-core must first know which middleware!
the middlewares() method in xyz-core returns an object containing all middlewares in the system. Next, you should choose your target from this object. Let’s jump right into the code:
let _dummyLogger = require('./dummy.logger')
mathMS.middlewares().transport.server('CALL')(4000).register(0, _dummyLogger)
We first choose .transport layer. Next, a route named CALL, which is the default route of all messages. Next we choose a server on port 4000, which is the default port of math.ms.js and finally, we insert the function to that middleware using .register() at index 0.
Now that you have seen an example of this, seeing its source code can clear things up.
If you run math.ms now and send some messages to it using string.ms, you should se something like this:
i was called! now what?
LOGGER :: http message received on port 4000 with body {"userPayload":{"x":2,"y":5},"service":"/decimal/mul"}
if you put a log inside math.ms.js when registering /decimal/mul,you see that our new middleware was invoked before the response was sent.
mathMS.register('decimal/mul', (payload, response) => {
  console.log('decimal/mul was called!')
  response.jsonify(payload.x * payload.y)
})
for more information about inserting middlewares and .register(), you can see Generic Middlewares Handler class.
Note that many variables in both send and receive middleware will be used to parse/export the message. Altering them will indeed have consequences. Albeit, not all alterations are harmful. As an example, consider the following scenarios:
- Applying a pre/post-processing to all request, like adding fix headers, message encryption or serialization.
- logging systems
- validation: note that by calling
end(), the request will be dismissed. Furthermore, you have the response object (resp) and you can respond to an unauthorized message in a middleware and don’t even bother sending it to Service-Repository layer! - reusability of middlewares
- last but not least! authentication. Although this is analogous to validation, we are going to mention it separately since we are going to implement one in the next section:
An authentication middleware:
Suppose that your system uses a very simple authentication system, a shared-secret mechanism. This is because we don’t want to complicate matters with different authentication mechanism, instead, we want to focus on how to add any authentication mechanism to xyz. You want authentication to happen in Transport layer. This is generally better because the Transport layer can drop unauthorized requests immediately and the Service-Repository layer, which is more critical, won’t be bothered to check them twice.
We are going to place two middlewares in Transport layer for this purpose, namely in HTTP Server middleware*, the default Transport server.
One middleware is going to be placed in the outgoing route and it should append a shared secret to the message’s body. Another middleware will be placed in the Server route and it should check to see if that shared secret exists or not. The receiving middleware can destroy the message if it does not have correct secret and this keeps the rest of the system safe.
The last note is to get familiar with parameters of an outgoing middleware, similar to the server middleware which we have already seen. An outgoing middleware has the following parameters:
- xSentMessageMwParam (interface: ITransportSentMessageMwParam)
- next()
- end()
- xyz
export interface ITransportSentMessageMwParam {
  requestConfig: ITransportSentMessageConfig
  responseCallback: (err, body, resp) => void
}

export interface ITransportSentMessageConfig {
  hostname: string
  port: number
  path: string
  method: string
  json: ITransportSentMessageBody
}
where:
.requestConfig. The data of the message is stored in a key inrequestConfignamedjson(since we wanted the api to be similar to node’s native http). Therefore, if we are to add a data to the request, we should add keys torequestConfig.json..responseCallback
The sender side is fairly (perhaps more than fairly) simple:
//auth.send.js
const SECRET = 'SHARED_SECRET'

let _authSend = function (xSentMessageMwParam, next, end) {
  xSentMessageMwParam.requestConfig.json.authorization = SECRET
  console.log('auth header added')
  next()
}

module.exports = _authSend
and in the receiving side:
//auth.receive.js
let _authReceive = function (xReceiveMessage, next, end) {
  let payload = xReceiveMessage.message
  let req = xReceiveMessage.meta.request
  let authorization = payload.authorization

  if (authorization === SECRET) {
    console.log('auth accpeted')
    next()
  } else {
    console.log('auth failed')
    // it's better to also close the request immediately
    req.destroy()
    end()
  }
}

module.exports = _authReceive
Similarly, we can insert these middlewares into the system using:
// math.ms.js
let _authSend = require('./auth.send')
let _authReceive = require('./auth.receive')
mathMS.middlewares().transport.server('CALL')(4000).register(0, _authReceive)
mathMS.middlewares().transport.client('CALL').register(0, _authSend)
and
// string.ms.js
let _authSend = require('./auth.send')
let _authReceive = require('./auth.receive')
stringMS.middlewares().transport.server('CALL')(5000).register(0, _authReceive)
stringMS.middlewares().transport.client('CALL').register(0, _authSend)- Note that adding a middleware to an outgoing route does not require a
portto be specified. This is because outgoing message are independent of the incoming messages. - Note that the
string.msis listening on port 5000, hence we must indicate this when adding middleware
You might ask why are we indicating 4000 and 5000 as the port? doesn’t the system already know that? Yes it knows. But the point is that this tutorial is centered around HTTP transport which is the default Transport layer. You will soon learn how to add multiple servers to your node and use them. In this case, you must explicitly indicate the port to point to a specific middleware.
Again, note that what you add to the json key is not available to the application layer. That is to say, you do not need to explicitly delete it from the object. Add a log to the receiving function and and double check this.
If you run both systems now, you see that everything is working as expected and the two systems can still communicate. Change the const SECRET = .. value in one node and see how it causes messages to be ignored by the Receiving.
Where to go next?
Congrats! you have just learned something very awesome. This tutorial teaches you almost enough to use xyz, and some third party middleware packages. But, if you are interested in knowing more, you are encouraged to read the Advance Topics section.